MIXARS DUO MKII
INSTALLATION
Firmware & Drivers
Firmware: Update the firmware of the unit to the latest version from Mixars
Drivers: Install the latest drivers (only for Windows computers) from Mixars
(in case you have not done already)
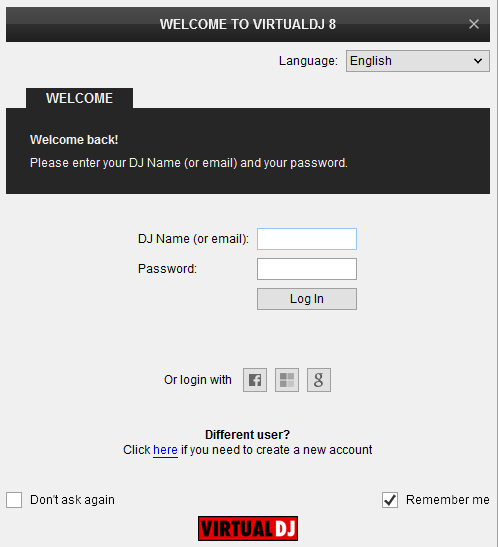
Once VirtualDJ 8 is launched, a Login Window will appear. Login with your virtualdj.com account credentials. A Pro Infinity or a Pro Subscription License is required to fully use the Mixars DUO MKII.
Without any of the above Licenses, the controller will operate for 10 minutes each time you restart VirtualDJ.
Buy a license
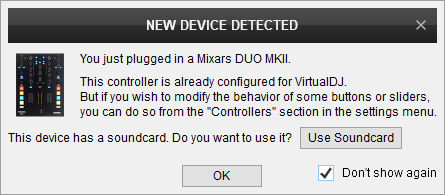
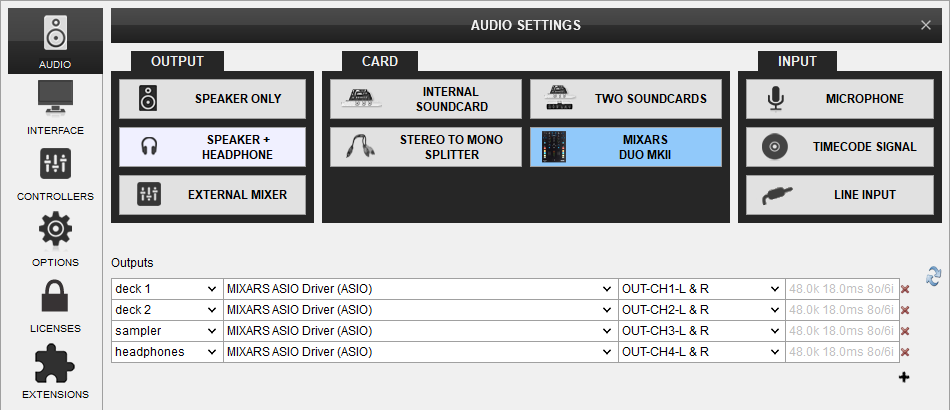
Click on the "Use Soundcard" button for VirtualDJ to apply the predefined audio setup with the built-in sound card of the DUO MKII. You can still change that from Settings->AUDIO tab.
Click to OK.
Advanced Setup
MIDI Operation
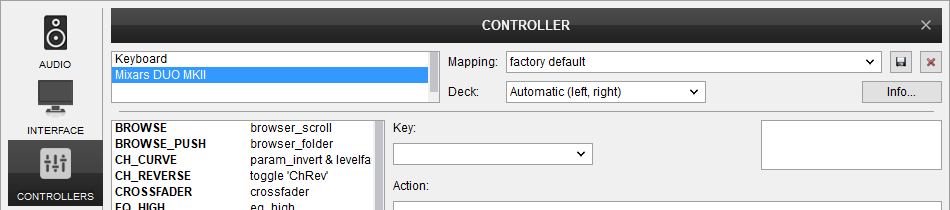
The unit should be visible in the CONTROLLERS tab of Config and the “factory default” should be available/selected from the Mappings drop-down list. The factory default Mapping offers the functions described in this Manual, however those can be adjusted to your needs via VDJ Script actions.
Find more details at
VDJ Pedia
AUDIO Setup
The unit has a pre-defined Audio setup and a special button in the AUDIO tab of Config to provide that. Alternative Audio setups can be applied in the same window.
For further software settings please refer to the Manuals of VirtualDJ 8
Top Panel
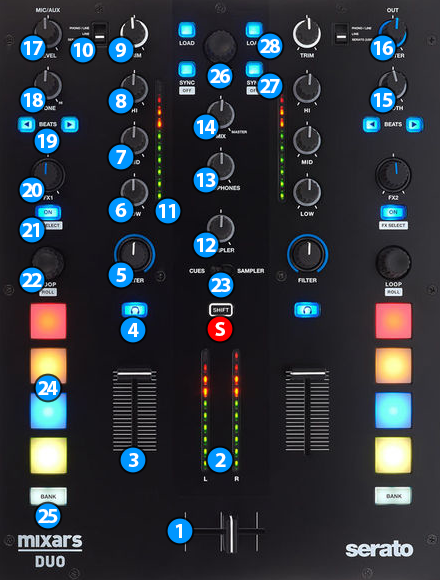
S SHIFT: Hold this button down to access secondary functions of Mixars DUO MKII (mainly in black lettering inside a white box)
MIXER CONTROLS
- CROSSFADER. Blends audio between the channels assigned to the left and right side of the crossfader.
- MASTER OUTPUT VUMETER. Shows the master output volume of the unit. Hardware operation.
- VOLUME. Adjust the Volume of each channel.
- CUE (PFL). Press these buttons to send each channel to the Headphones Output channel.
- FILTER. Adjust a resonance lowpass/highpass filter for each channel. When in middle position, the FILTER has no effect on the sound.
- LOW EQ. Adjust the Low frequencies for each mixer channel.
- MID EQ. Adjust the Mid frequencies for each mixer channel.
- HI EQ. Adjust the High frequencies for each mixer channel.
- GAIN. Adjust the Gain of each mixer channel. Note that the "zero gain / park" position is 12 o clock.
- INPUT SELECTORS. Define the source of each Channel. Put the switchers to Serato (USB) position for software mixing.
- CH INPUT VUMETER. Shows each channels input (pre fader) volume.
- SAMPLER VOLUME. Adjust the Master Output Volume of the VirtualDJ Sampler
- HEADPHONES VOLUME. Adjust the volume of the Headphones Channel. Hardware operation, but movement visible on the VirtualDJ GUI.
- HEADPHONES MIXING. Adjust how the Channels and the Master Output blend at the Headphones Channel. Hardware operation, but movement visible on the VirtualDJ GUI.
- BOOTH VOLUME. Adjust the level of the Booth Output of the DUO MKII. Hardware operation, not visible on the VirtualDJ GUI.
- MASTER VOLUME. Adjust the level of the Master Output. Hardware operation but movement visible on the VirtualDJ GUI
- MIC/AUX VOLUME. Adjust the level of Mic/Aux input of the DUO MKII. Hardware operation, not visible on the VirtualDJ GUI.
- MIC/AUX TONE. Adjust a single parameter EQ for Mic/Aux input of the DUO MKII. Hardware operation, not visible on the VirtualDJ GUI.
EFFECT CONTROLS
- BEATS: Use these buttons to half/double the Beats Parameter of the selected Effect (for Effects that are beat-aware).
- FX LEVEL: Use this knob to adjust the 1st Parameter of the selected Effect.
- FX ON: Use button to enable/disable the selected Effect. Hold down SHIFT and press this button to select the next available effect.
LOOP CONTROLS
- LOOP: Turn this knob to adjust the size used by automatic loops, or to change the length of the current loop. Press the knob down to activate/deactivate an automatic loop. Hold down SHIFT and press the knob down to activate a momentary Loop Roll effect (for as long as the knob is held down)
PAD CONTROLS
- CUES/SAMPLER: Use this switch to control whether the PADS (24) of DUO MKII will control hotcues or samples.
- PADS: These PADS offer 2 modes depending on CUES/SAMPLER (23) switch position.
HOTCUES:
The Hot Cues mode is divided to 2 sub pages. The first page will control hotcues 1-4 and the second page will control hotcues 5-8.
In order to switch between the 2 different pages use the BANK (25) button.
When the BANK button is lit, the second page is selected.
Each one of the 4 pads assigns a Hot Cue Point, or jumps the track to that Hot Cue Point (if assigned).
When a Hot Cue Button is unlit, you can assign a Hot Cue Point by pressing it at the desired point in your track. Once it is assigned, the Hot Cue Button will light on.
Hold SHIFT and then press a pad to delete its assigned Hot Cue Point.
SAMPLER:
The Sampler mode is divided to 2 sub pages. The first page will control samples 1-4 and the second page will control samples 5-8.
In order to switch between the 2 different pages use the BANK (25) button.
When the BANK button is lit, the second page is selected.
Each one of the 4pads triggers a sample from the selected Sampler Bank of VirtualDJ. If a bank has less than 9 samples, both sides of the DUO MKII will control the same samples. If a bank has more than 8 samples, the left side of DUO MKII will control samples 1 to 8 and the right side samples 9 to 16.
Press the pads to trigger a sample. Depending on the selected trigger Pad mode, use SHIFT and the same pads to stop the sample. - BANK: Changes the active page of the PAD (24) buttons
BROWSER AND OTHER CONTROLS
- BROWSE:
Turn: Scrolls through files or folders.
Push: If focus is on the Songs list press the knob to set focus on the Folders list. If focus is on the Folders list, press the knob to open/close subfolders. - SYNC: Press this button to automatically match the corresponding Deck's tempo with the opposite Deck's. Hold SHIFT and press this button to reset the track's pitch back to it's original value.
- LOAD: If focus is on the Folders list press this button to set the focus on Songs list. If the focus is on Songs list press this button to load the selected track on the deck.
Front - Rear Panels
FRONT PANEL
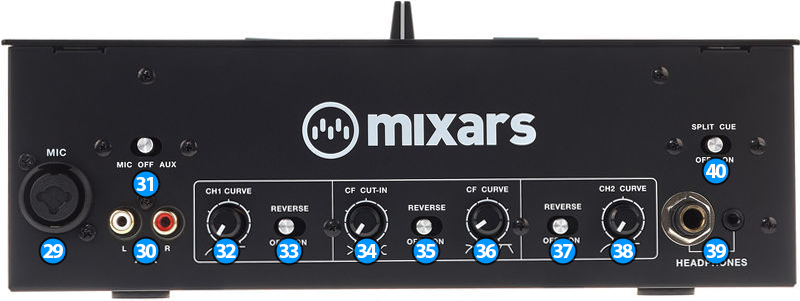
- MIC Input: Connect a mic on the DUO MKII. You can use XLR or Jack (TRS) connectors.
- AUX Input: Connect an auxiliary device.
- MIC/AUX switch: Select whether MIC or AUX input should be send to DUO MKII Master Output. When the switcher is im middle position (OFF) none of the two inputs is send on Master Output.
- Ch1 Fader Curve: Adjust the fader curve for channel 1 (hardware operation)
- Ch1 Reverse Fader: Reverse the direction of fader for channel 1 (hardware operation)
- CF Cut In: Adjust the crossfader cut-in point (hardware operation)
- CF Reverse: Reverse the direction of the crossfader (hardware operation)
- CF Curve: Adjust the curve of the crossfader (hardware operation)
- Ch2 Reverse Fader: Reverse the direction of fader for channel 2 (hardware operation)
- Ch2 Fader Curve: Adjust the fader curve for channel 2 (hardware operation)
- HEADPHONES CONNECTOR: Connect your headphones. Both sizes (3.5mm and 6.35mm ( 1⁄4 in)) are offered.
- SPLIT CUE: Split the sound of Headphones and Master channel to the left and right side of your headphones. (Hardware operation)
REAR PANEL
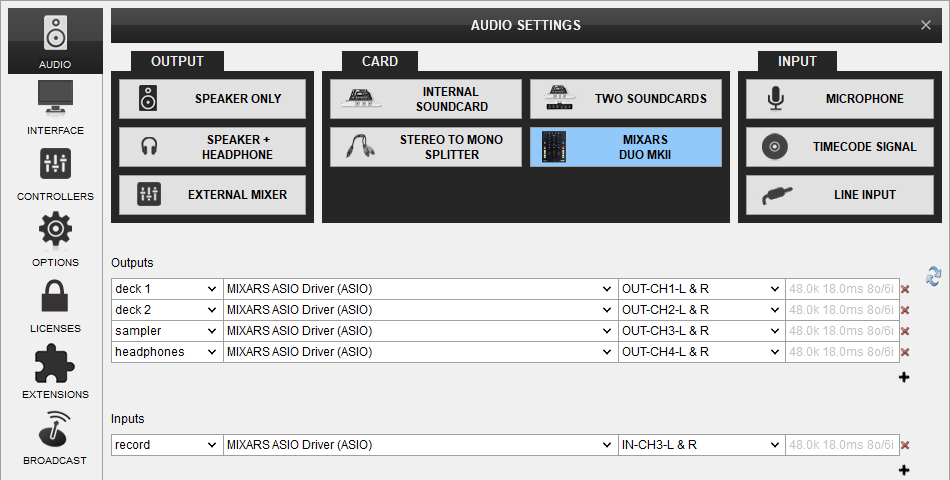
Advanced Audio Setup
Mixars DUO MKII offers a variety of different Audio Setups and Operation modes. The possible configurations are described here.
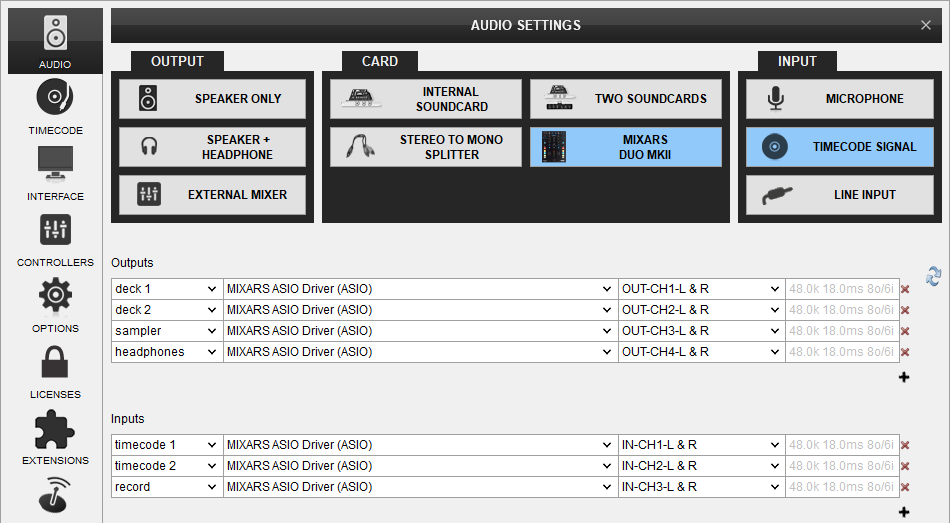
Recording & Broadcasting
The unit offers the ability to record your mix on VirtualDJ directly from VirtualDJ record button (in the MASTER center panel).
However if you wish to record your Microphone or any other input among with your mix you need to re-configure the sound setup to include a recording loop back.
Timecodes (DVS)
Mixars DUO MKII offers DVS (Timecoded CDs and Vinyls) Support.
Depending on whether you use Timecode Vinyl (Turntables) or Timecode CDs (CD Players) please perform the following steps:
- Connect your Turntables or CD Players on the inputs marked as "Serato Input" on the back of the unit
- Set the Phono/Line switcher in each input to the appropriate position depending on whether you connected a turntable or cd-player on the step above.
- Place the Input switches on the top panel to Serato (USB) position
- Open VirtualDJ Settings ->AUDIO tab ans press the TIMECODE SIGNAL button from the INPUT tab
- Click to APPLY
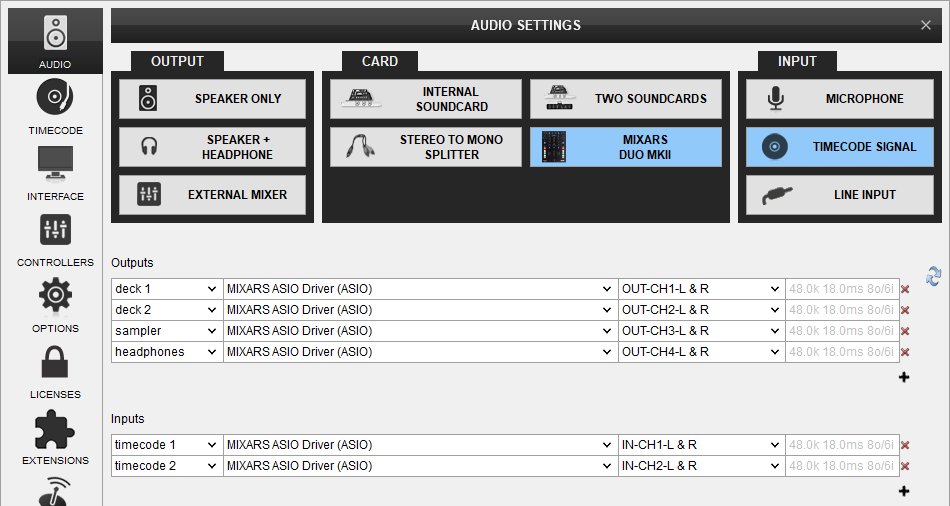
Use the TIMECODE On/Off buttons that will be offered on the Decks (or in the SCRATCH panel for the 4 Decks default VirtualDJ GUI) to enable/disable Timecode control.
If you want to be able to record your mix including your MIC and AUX inputs then add a recording loop back as in the previous section of this manual.
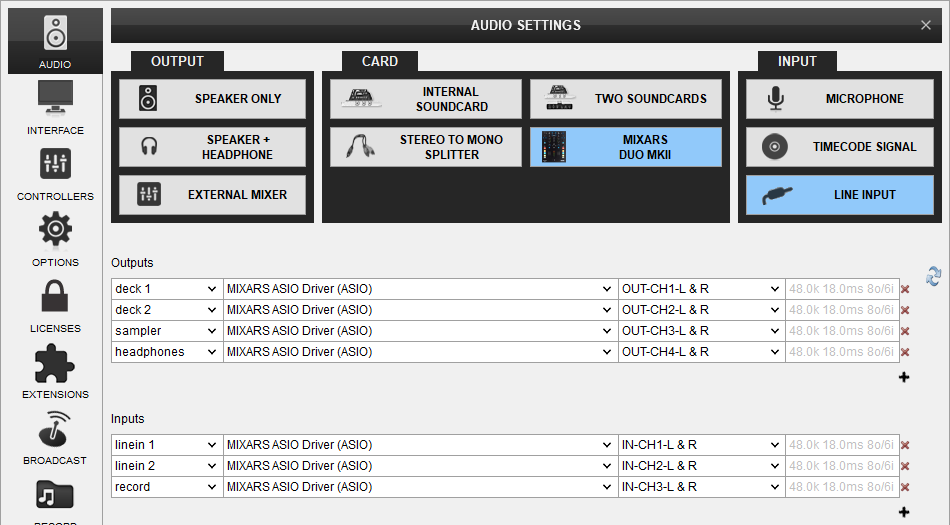
LINE INS
The LINE Inputs can be also used to send audio signal from an analogue media source connected at the rear panel to VirtualDJ for processing.
- Connect your analogue media devices to one of the available inputs marked as "Serato Input" on the back of the unit.
- Switch the Line/Phono switcher to Line position for that channel(s)
- Place the Input switches on the top panel to Serato (USB) position
- Open VirtualDJ Settings ->AUDIO tab and press the LINE INPUT button from the INPUT tab
- Click to APPLY
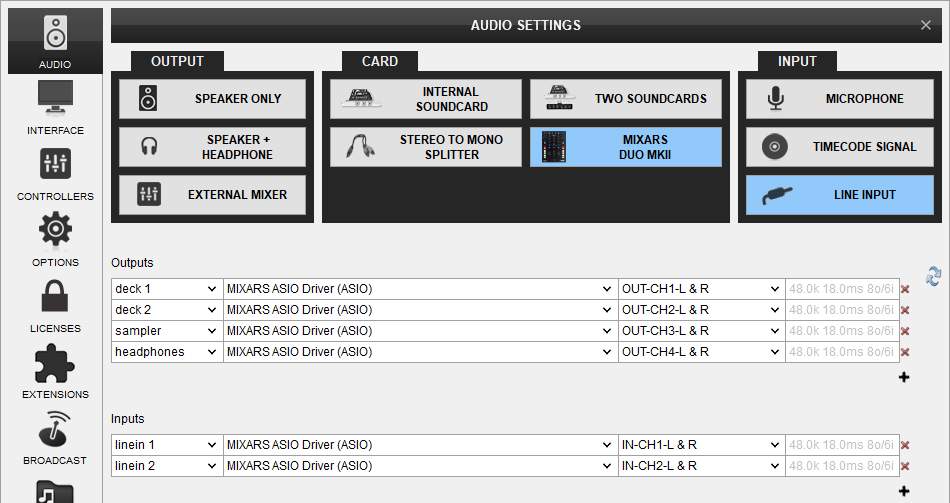
Use the LINE IN On/Off buttons that will be offered on the Decks (or in the SCRATCH panel for the 4 Decks default VirtualDJ GUI) to enable/disable Line In routing to a VirtualDJ deck.
This will provide the ability to synchronize BPM with other decks, use Effects etc.
If you want to be able to record your mix including your MIC and AUX inputs then add a recording loop back as in the previous section of this manual.
MICROPHONE INPUTS
Mixars DUO offers 2 Microphone Inputs and Level/EQ controls from the top panel. Both audio signals from these inputs are directly routed to the Master Output of the unit.
The Microphone inputs are not part of the USB Audio interface, so these cannot be added in VirtualDJ Audio setup and will not control the software Microphone section in the MASTER panel of VirtualDJ GUI and vice versa.
However, as mentioned in the Recording section, both Microphone Inputs can be recorded via the REC button of VirtualDJ via the dedicated recording input channel of the Audio interface.
